A desiccant (adsorption) air dryer is critical in industrial compressed air systems. It removes water vapor to deliver clean, dry air and protect downstream equipment, instruments, and end products.
However, like any mechanical system, a desiccant air dryer can develop recurring faults—often showing up as high outlet dew point, unstable pressure, excessive purge loss, frequent alarms, or unexpected shutdowns.
This guide breaks down the most common desiccant air dryer problems, explains the root causes, and provides practical fixes and prevention strategies to reduce downtime and extend dryer life.
Quick Diagnostic Checklist (Start Here)
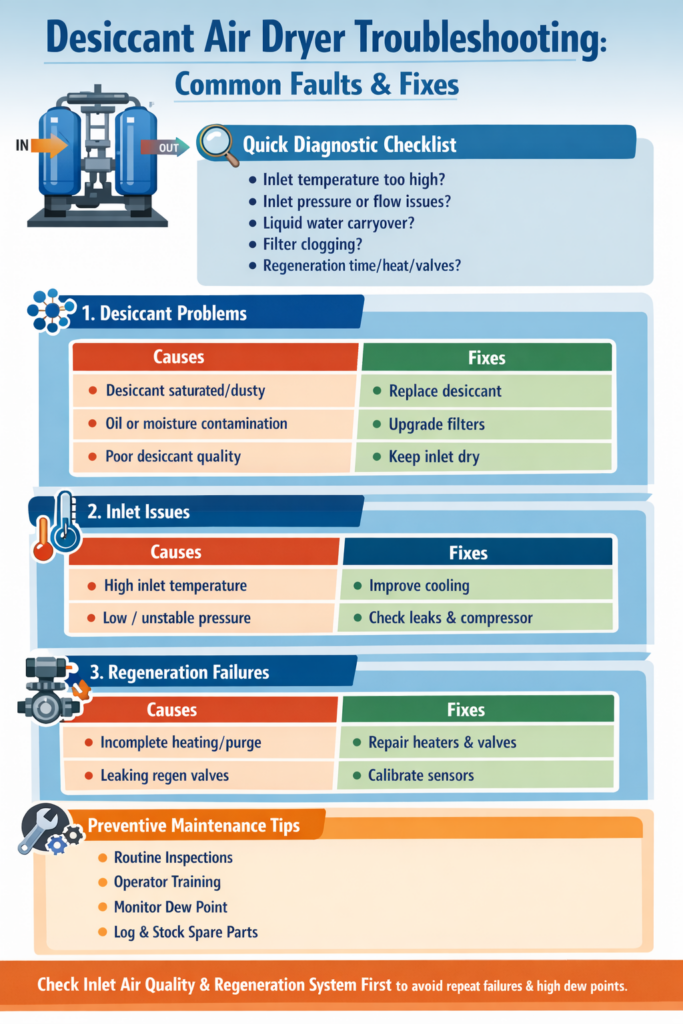
Before you open the dryer or replace parts, check these five items—many “dryer failures” are actually system-condition problems:
Inlet temperature: Is the air entering too hot (aftercooler not performing)?
Inlet pressure & flow: Is pressure stable and within dryer design range? Is flow exceeding rating?
Liquid water carryover: Is the water separator/drain working? Any water slugs entering the dryer?
Pre-filters / after-filters: Any pressure drop indicating clogging?
Regeneration: Is purge/heat/time sufficient? Any valve leakage?
If any of these are out of spec, correct them first—otherwise faults will repeat even after replacing desiccant or valves.
1) Desiccant-Related Problems
1.1 Desiccant Exhaustion (Loss of Drying Capacity)
What you’ll see
Outlet dew point rises gradually over time
Dryer struggles to meet required dew point even though cycles appear normal
Why it happens
Desiccant saturation over service life: pores fill with moisture and capacity drops
Oil contamination or particulate fouling: oil aerosols and dirt coat the desiccant surface
Low-quality desiccant: shorter life, higher dusting, early performance decline
How to fix it
Inspect desiccant condition and replace saturated/contaminated media
Upgrade upstream filtration (especially oil coalescing) to protect the bed
Choose high-quality desiccant appropriate for your target dew point and operating conditions
Prevention tips
Keep accurate service records (hours, dew point trend)
Control inlet air quality and prevent oil/water carryover
1.2 Desiccant Clogging, Dusting, or Channeling
What you’ll see
Higher pressure drop across the tower
Reduced drying performance even with “fresh” desiccant
Dust in downstream filters, mufflers, or valves
Why it happens
Desiccant attrition (powdering) from poor quality media, vibration, or frequent pressure shocks
High moisture load / liquid water carryover accelerates breakdown and clumping
Harsh ambient conditions (high temperature, high humidity) increase stress on the bed
How to fix it
Replace heavily dusted/clumped desiccant; clean towers if necessary
Fix upstream causes: aftercooler, separator, drains, filters
Ensure proper installation: correct fill level, support screens, and flow distribution components
Prevention tips
Avoid inlet liquid water at all costs—this is a top cause of rapid desiccant failure
Stabilize operating pressure and reduce sudden flow surges
2) Inlet Temperature and Pressure Problems
2.1 Inlet Temperature Too High
What you’ll see
Dew point increases, especially during hot seasons
Dryer “looks normal” but cannot meet dew point spec
Why it happens
Aftercooler or cooling system underperforms (fouling, low cooling water, poor airflow)
High ambient temperature and inadequate ventilation around equipment
How to fix it
Ensure the dryer receives air within its rated inlet temperature range
Service the aftercooler and improve ventilation
Add/upgrade a pre-cooler if the compressor discharge temperature is consistently high
Prevention tips
Treat inlet temperature as a performance “multiplier”: hot inlet air dramatically increases moisture load
2.2 Inlet Pressure Too Low (or Unstable)
What you’ll see
Tower pressure cannot build to system pressure
Drying performance drops; switching becomes abnormal
Purge losses may become excessive or inconsistent
Why it happens
Clogged inlet filter elements increase restriction
Compressed air piping leaks or undersized lines cause pressure drop
Compressor output instability or insufficient capacity
How to fix it
Replace/clean clogged filter elements (verify differential pressure)
Repair leaks and confirm correct pipe sizing
Service the compressor and confirm stable discharge pressure
Prevention tips
Track pressure drop across filters and towers as a routine KPI—rising DP is an early warning
3) Regeneration System Problems
3.1 Incomplete Regeneration (Insufficient Heat/Time/Purge)
What you’ll see
Dew point worsens after a few cycles
One tower seems to “never fully recover”
Increased alarms related to dew point or cycle timing
Why it happens
Heater failure (heated dryers): damaged heating element, wiring fault, protection trip
Regeneration valves malfunction: leakage, sticking, blockage
Control logic/sensor errors: wrong timing, faulty temperature/pressure feedback
Purge flow too low (heatless dryers): wrong orifice, blocked muffler, incorrect settings
How to fix it
Verify regeneration parameters: temperature, time, purge flow, cycle sequence
Repair/replace heaters, solenoids, actuators, or faulty valves
Check sensors and calibrate/replace if readings are unstable
Inspect mufflers/silencers and purge flow components for blockage
Prevention tips
A dryer can only dry as well as it regenerates—regeneration health is the core of long-term stability
3.2 Regeneration Valve Leakage
What you’ll see
Unexpected air loss, higher energy cost
Poor regeneration efficiency and unstable dew point
Audible leaking or continuous venting
Why it happens
Worn sealing surfaces, debris on seats
Actuator issues, solenoid faults, mechanical sticking
How to fix it
Overhaul or replace leaking valves; clean seats and remove contamination sources
Inspect actuators/solenoids and ensure correct control signal and air supply (if pneumatically actuated)
Prevention tips
Install and maintain upstream filtration to keep debris and oil away from valve internals
4) Electrical and Control System Problems
4.1 Power Supply Faults
What you’ll see
Dryer fails to start, random resets, intermittent alarms
Heaters/solenoids behave unpredictably
Why it happens
Loose wiring, aged power cables, poor grounding
Failed switches, contactors, breakers, or protection devices
How to fix it
Inspect terminals and wiring; tighten and re-terminate as needed
Replace damaged switches/contactors; verify stable voltage within specification
4.2 Controller / PLC or Sensor Faults
What you’ll see
Regeneration cycle won’t start/stop correctly
Wrong switching timing or inconsistent tower behavior
Temperature/pressure/dew point readings jump or drift
Why it happens
Program logic errors, parameter misconfiguration
Faulty temperature/pressure sensors or wiring issues
How to fix it
Review parameters (cycle time, heater setpoint, purge setting) and restore known-good configuration
Test sensors and replace failed components; verify signal integrity
5) Other Common Issues
5.1 Filter Blockage
Impact
Lower inlet pressure → weaker drying performance
Higher outlet dew point and reduced system efficiency
Fix
Replace or clean filter elements on schedule
Improve pre-filtration to match inlet air quality (dust/oil load)
5.2 Abnormal Noise
What it may indicate
Damaged valves, failed mufflers/silencers
Airflow impact due to sudden restriction or incorrect piping
Electrical problems such as motor overload (if applicable)
Fix
Inspect mechanical components and replace damaged parts
Reduce vibration and resonance with proper mounting/support
Diagnose electrical faults and correct overload/connection problems
6) Preventive Maintenance Strategy (Reduce Failures and Extend Dryer Life)
To lower failure rates and extend service life, implement a structured maintenance system:
Routine inspection plan: daily checks + scheduled cleaning + preventive replacement
Operator training: ensure correct operation, safety, and alarm response
Use OEM or verified-quality parts: valves, seals, sensors, desiccant, filter elements
Environmental control: avoid extreme heat and humidity; ensure ventilation
Condition monitoring: track inlet/outlet pressure, temperature, dew point, and differential pressure
Failure log & root cause tracking: record time, cause, fix, and outcome to prevent repeats
Spare parts inventory: keep critical spares (valve kits, solenoids, sensors, filter elements, drains)
Conclusion
Desiccant air dryer faults are rarely “random.” Most repeat failures come from inlet conditions (temperature, pressure, water/oil carryover), desiccant health, or regeneration integrity.
By combining correct troubleshooting with a preventive maintenance strategy, you can significantly reduce downtime, stabilize dew point performance, and protect the entire compressed air system.